Saturday, June 11, 2016

Small Updates

A couple small updates:

First, I forgot to mention that on my first real ride my son and I found this flag laying in the middle of the road at an intersection. I took it as a good omen.


Also, I didn't like having nothing on the sides of the starter cover - obviously I couldn't leave the R90/6 emblems on there though. Besides looking like it was missing something, the casting was really rough and I couldn't clean it up enough to remove the pits. So I got a later model starter cover - the one that's got "BMW" on the side, cut off the emblems, ground/sanded them down and then blasted them clean. I think I'll leave them unpainted as a nod to the original R50/2 engine.


Sunday, May 29, 2016

And Done

I'm calling her done - although is that really a thing? I had three great 20 minute-ish rides but now I've got to check for intake leaks - all of a sudden my RPMs won't go down after I blip the throttle.

But, here's "done" pictures and a video. I gotta say, I've very pleased with the result:


Wednesday, May 25, 2016

First Start and Ride!

The video is a bit shaky, but you can't recreate first ignition and ride! I'll post some finished pictures and a video walk around this weekend.

I'm a little concerned about my charging circuit, but I think it's fine. I'll also do further testing this weekend.


Tuesday, May 17, 2016

Final Wiring Diagrams

Here are my final wiring diagrams that I used. Although they are fairly specific to my needs, they might be helpful to someone else. Wiring is oddly one of my favorite parts - I like the puzzle aspect to it. Feel free to post questions or comments regarding what I did.

I think most of it is fairly non-controversial, but I'll make 2 comments: (1) someone else might not have included all three relays on the same battery hot wire. My thought was that only one of the relays would be pulling current at a time since I'll start the bike with the lights off. Thus, I didn't think separate power wires were necessary; (2) Reg/rec instructions usually suggest that you hook up the wire that provides current from the reg/rec to the battery directly to the battery's positive terminal. I don't like to do that because I like a fuse between the battery and the reg/rec in case the reg/rec fails to do its job and causes a current spike that damages the battery. So that is why I attached the reg/rec feed wire after the fuse on the same wire that goes from the battery to the ignition switch. This leave my ignition switch unfused, but nothing else.

When I draw up my diagrams I like to put the components roughly in the spots where they are on the bike. Sometimes that creates some space issues, but by the time I realize it it's really to late to do anything about it. So, I'll live with my charging and ignition components kind of being scrunched up.


Monday, May 16, 2016

we're at 99%!

I am all but done with the project - I just ran out of time this weekend to finish up.


The wiring and cables are all installed and working properly (although I haven't tested the charging or ignition circuits).


I was originally going to use the stock points ignition so I had to make room for the Alpha electronic ignition but it worked out. In an ideal world I wouldn't want the ignition module under the tank, but space is limited. Likewise, I wouldn't want my reg/rec right behind the engine, but that's where it fit best.

I just have to fit the gas lines and line up the airbox snorkels - for some reason they're not lining up. I'm sure I put one of the boots on wrong or something. The petcocks should work, but I'll have angle them backwards, even on the right hand side.

I had to make about a 2" spacer to attach the horn so it cleared the front engine cover but didn't hit the front forks.

It turns out the /2 clutch cable has the same amount of exposed cable as the /6 cable, so I didn't have to cut it down like I thought I would. I used Tom Cutter's clutch cable instructions found here to adjust the cable. Ultimately, I used /2 brake and clutch cables since I'm using the /2 hand controls but I had to use /6 throttle cables so they would attach to the /6 carbs. I though I would have to modify one or more cables, but they all worked great.

I installed one of Vech's Brown style side stands. I had to heat it and bend it out a bit to get a better angle, but it seems to work well.

I got some stainless r69s mufflers from Keihan Systems in England. They were great to deal with and had my mufflers at my door in just over a week. I'm sure I'll never see my original mufflers from Epco - that was a very disappointing realization. Now we just have to get Keihan to start making conversion headers.

Hopefully my next post will be of a first start video!

Thursday, April 28, 2016

Engine is in the Frame

I picked up my engine and immediately dropped it in the frame when I got home. It does look very nice.

With the transmission and all of the covers (including the deep oil pan) off, it went in without too much fuss. It did take me a couple minutes to realize that I had to tilt the rear of the engine upward in order to get the tranny back in position.

I shimmed the engine all the way to the right and still had to adjust the swingarm to the left of center a bit so that the driveshaft was in the middle of the swingarm housing. Hopefully that won't affect handling.


I've since ran the gauge cables (I needed to order throttle cables - I had new r50/2 cables, but they don't play nice with the R90 carbs. It also looks like I will have to modify the r50/2 clutch cable outer sleeve to work properly) and finished most of the remaining wiring. The rest of the wiring (and my completed wiring diagram) should be done this weekend.

I've all but given up on getting my mufflers from Tom at Epco. He doesn't seem to pick up the phone anymore. I've got some cheap Emgo mufflers I can use in the meantime. I was also disappointed to see that the crossover on the conversion headers he made me was significantly out of alignment. I managed to get them on, but I'll probably have to cut the crossover to ever get them off. Hopefully the misalignment doesn't cause leaks.

Friday, April 8, 2016

Almost there

Engine should be done today. Maybe I'll get a chance to slip it in the frame next weekend!


Monday, March 14, 2016

Engine work!

I worked with Tom Cutter for two days on my engine last week. I did all the cleaning and vapor blasting of parts while he did the disassembly and diagnosis. I still have the engine block and tranny housing to do, so I think I'll try to get back up there this week.

 Among the most painful issues found were: (1) one of the cylinders was rusted beyond honing (looking into nikasil plating), (2) the entire ignition system was hosed (will replace with an electronic unit); (3) one of the head covers was unrepairable (will replace with siebenrock racing repops)  and (4) kicker/tranny cover was cracked (he had an extra). The parts lists just keeps increasing and it's getting intimidating!

I opted not to get an aftermarket charging system, but we are upgrading to a later year that has a little more output. I also added an upgraded starter.


Sunday, June 7, 2015

More Wiring!

I did the rest of the wiring that I could without the engine and ran all of the wires how I wanted them - that's about 95% of the wiring. I have no idea how the wires were originally  run, but I'm satisfied with the way it is.

I've updated the wiring diagrams to indicate the proper wire color (based on what I had available) and wire positions).  I'll post them when the bike is done.

The last step, once the engine is in, will be to wrap all the wire bundles in split braid loom.


I also tried a trick I heard about recently - hiding damaged chrome.  I rubbed a few spots (primarily the axles) with Rub-n-Buff Silver Leaf.  It basically fills the rusty pits in the chrome with a silver wax paste.  I've been told it should last a season, but we'll see.


Friday, May 15, 2015

Fresh Paint and Stripes!

I got my tank and fenders back from O'Neill's Auto Body in New Holland Pa.  Over all it looks great - there's a couple dust specks I may want them to buff out, but that's it.  I think the pinstripes look fantastic - I was worried about those since I insisted on hand striping.

I also shimmed the wheels and got everything else where it should be.  I shouldn't have to mess with the chassis again.

Now I just need my engine back from Tom Cutter at Rubber Chicken Racing and my mufflers from Epco Mufflers.  Cutter was in an accident recently, so that will slow his schedule.  Epco feeds me an excuse whenever I call, but I'm pretty sure I'll get them eventually.

Then I just have to finish the wiring and run the cables once the engine is in!  I think I'll be lucky to have it done this season, but we'll see.


Sunday, October 26, 2014

Tins and Brakes

I sorted out the rear brake, which took me longer than I expected.  It was a bit like one of those bar puzzles made of nails.  I also mocked up the fenders and tank and tweaked them here and there.  I'm going to pick a painter and send them out in a week or so, so I wanted to make sure everything fit reasonably.


Saturday, October 25, 2014

Roller!

I finished shimming, greasing and installing the wheel bearings.  It's all pretty straight forward.  I made a tool (a length of copper pipe) to keep the bearing stack together, heated the hub and slipped the stacks in.  I've got the newer wheel nuts with the rubber seals, so I replaced the seals.  I also swapped out the old inner felt seals with rubber ones from Benchmark Works.

 I ended up not replacing the wheel bearings - they looked almost new.  I just cleaned them with kerosene and brake cleaner and repacked them. Late last night I  realized I had put all of the top hat spacers in wrong on both swing arms, so I went out into the garage in my pj's and pulled the swing arms and fixed them.  Luckily, I didn't need to replace the seals.


I also installed the center stand and did a video about installing kickstand springs:


Tomorrow I'll fit the fenders and tank just for fun and also set up at least the rear brake if not the front as well.

The Final Drive Is Done

I popped open the final drive and nothing was sketchy - it looked good to my untrained eyes.  I was afraid I'd find rust, chipped gears, etc. While I was in there I replaced the cover gasket and the ring gear seal.   Don't forget to protect the new seal with a Coke can or something when you put the cover back on.

Heat is the key to getting these things open and then back together.  I heated the cover in the oven and installed it twice, but the ring gear bearing still didn't seat right either time.  Finally, I took the combined advice of Vech and Duane Ausherman and put the whole final drive in the oven for an hour at 200* and then tapped both gear shafts and gave it a couple good thumps with the ring gear facing down.  That settled everything.

I've still got some Honda moly 60 paste from my last shaft drive bike, so I coated the wheel splines with that.


I hit the final drive with some sand paper, grit infused nylon wheels with some Neverdull and then finished off with some Scotchbrite pads and Flitz polish.  I also got new polished stainless swingarm and drive plugs.


Next up is to get some wheels on this thing!

Friday, September 19, 2014

Beginning the Reassebly

Because I know my engine won't be ready soon, I've started assembly of the roller.  The front end is all sorted and on, the seat is on, and the rear shocks and swing arm are on. Like I did with the front shocks, I rebuilt the rears.  Other than to adjust the rear swingarm once the engine is in, I won't have to touch any of that stuff again.


A metric thread file came in really handy for the neck threads and front axle threads.


The wheels are pretty much sorted, I just have to shim  the rear bearing stack a little bit.  I got some shims from Duane Asherman.

I may put the front wheel on this weekend, but before I put on the rear, I want to dig inside the final drive a bit and see what I see (hopefully nothing bad!)  That'll be the last major operation on the bike until I get the engine back.

I thought using the BMW grease fittings would be problematic, but it was super easy with a decent chainsaw greaser. For the front, I did use Duane's tip of wrapping a piece of rope around the left side to keep the grease in.

I also got a good deal on a used 20mm x 1.5 tap to clean out the threads on the frame for the rear swingarm pins.


I replaced both sets of swingarm bearings which should have been pretty straight forward, but as is usual for me, I spent far more time fixing screw-ups than actually progressing.  I somehow thought it would be a good idea to use the old race to set the new race in place in the rear swingarm.  It worked, but the old race got stuck in the swingarm too and it took me a good hour to get it back out without damaging the new race underneath! I also destroyed two seals trying to seat them in place.  I got some new ones (as well as a set of extras) from Hans at Hucky's Spares.  These went in with no problem, so I have to wonder if my first set (which came with the project) were too big.  I really like dealing with Hans, it's very old school since you order through email and he gives you a discount if you mail him a check.

Like I said, next up will be the final drive, then I can complete the roller.

Tuesday, August 12, 2014

Clean Carbs!


I cleaned up and rebuilt my 38mm Bings and made my wife video it.  She's a sport.

I talked to Tom Cutter, and my engine likely won't be done for this season, so I think I'll install the swingarm and head bearings and put the bike together as a roller.  Then I can just wedge the engine in when I get it and finish the wiring.

Sunday, July 13, 2014

More Stuff Cleaned Up

I've been spending my time cleaning and polishing (especially stainless bolts) while I wait for the engine to be done.  I love freshly polished aluminum against gloss black - it looks so clean.  I find it very satisfying when parts go from chipped, dirty and dull to fresh and bright.  I don't polish my metals to mirror shine - I'm too lazy for one thing - but I also like the warm glow created by less polishing.


I mentioned that instead of a turn signal indicator, I'm using that hole in the headlight bucket for my electric start button.  I tried to find a button that mimicked the original indicator.  Ridiculously, I think the thing I'm most proud of is getting the button to light up when I push it.  Originally I wasn't going to bother, but I think it looks really cool!


I placed the last of my big parts orders - I'll probably need odds and ends, but I shouldn't need anything else major.  I still need to clean the carbs, but then once the engine is back, it'll be assembly and wiring.  Paint won't come 'till the winter though (I think I might rattle can it for right now).

One other odd thing - I bought this project basically as a basket case bitsa bike, so I don't know how much of the 50/2 parts started life together.  What I do know is that several of the parts, including the brake linkage, steering damper, and various smaller pieces, were once painted metallic blue.  That would have been a bike to see!


Monday, May 26, 2014

Back from Powder Coat and Pipes!

I picked up everything from the powder coater and it's good.  I actually had to take back the frame and both swing arms to have them redone due to some bubbling, but now everything back.


Also, Tom from Epco came through with my stainless conversion headers - I ordered them about two and a half years ago and paid for time last September, but now I've got them.  They're quite nice too.  I'm still waiting on my stainless mufflers though.


Once I get the engine back, I can start assembly! Even if I don't have the mufflers, I've got others I can throw on in the meantime.

Sunday, April 13, 2014

New mounts and blasting

Saturday morning I decided to redo the coil and relay mounts - this time I did brackets instead of bungs.  I felt like there wasn't enough clearance under the tank when the coil was mounted horizontally - the wire rubbers were rubbing the tank.  The relays are bundled together now which I think is tidier.


Today, I media blasted - I went through 120 lbs of media - mostly coal slag from Tractor Supply, which is nice and cheap.  Unfortunately I didn't finish as I ran out of media.  I didn't get to the frame or the rear swing arm, and I didn't finish the front forks.  But everything else is done.  I'll ask the powder coater to finish the rest.  I'm going to use Chester County Coatings in Honeybrook, Pa. on my brother's recommendation.


I always think it will be economical to do my own blasting, but I forget what a huge pain in the ass it is. A few little pieces is fine, but most of a bike sucks.  Balancing the time, hassle, and supply cost vs paying someone to do it - I vote pay someone else.  That said, I do like the intimacy that the process affords - each sweep uncovering blemishes, cast marks, and serial numbers - it's stuff I'd never see if I didn't strip the parts myself.

I really like Eastwood - I think their stuff is a good balance of quality and price.  Growing up, they had a store in Frazer, Pa that I loved to go to.  It's closed, Pottstown isn't that far away.  For blasting, I've got both their 100lb blasting pot and their cheapy siphon gun.  I much prefer the little gun.  You can make one of these pretty easily with just an air gun attachment (my kids gave me this one for x-mas).

Once the coating is done and the engine is done, it will be time to assemble and wire.  Painting the tins will wait for another day - I'm tired of spending money and I know I'be got one more substantial order from Benchmark Works before it's all done.

Sunday, April 6, 2014

Parts!

Right - Ava is completely broken down.  I picked out everything I need to media blast and then get powder coated:


Maybe next weekend I'll get a chance to blast - I just need to find enough time to get it all done at once and then drop it off for powder coat.  Tech tip: Barrington Motor Work's /2 restoration book has section on what parts should be matte black and which gloss - one of the best x- mas presents ever.

I dropped off my 74 r90/6 engine and tranny withTom Cutter at Rubber Chicken Racing in Yardly Pa. In that I know nothing about the engine that came with this project and that the '74 had inherent problems, I wanted someone who knew their business to go through it.  I may have bitten off a bit too much but we'll see.  Tom has promised me basically a brand new engine - better than stock.  I just know it won't be cheap.  But, the money I get from the Rabbit should cover it, plus, he's been cool enough to let me come over and do some of the grunt cleaning and polishing work to save some cash.

In the dog house is Tom Epperson frrom Epco mufflers.  I ordered conversion headers two and a half years ago and have seen nothing.  I didn't actually pay for them until September 2013 (at which time I added a set of mufflers too)  - to the tune of $1,000.  Through last November, I've talked to Tom at least a dozen times and it was always: "oh, I'm looking at them, they'll be sent out in a couple days" - I hate that kind of bullshit.  However, now that I've paid, I can't even raise him on the phone.  Tomorrow, I'll be talking to the credit card company to see if I can reverse the charges.  I really don't want to lose the $1,000.

Sunday, September 15, 2013

The Rabbit

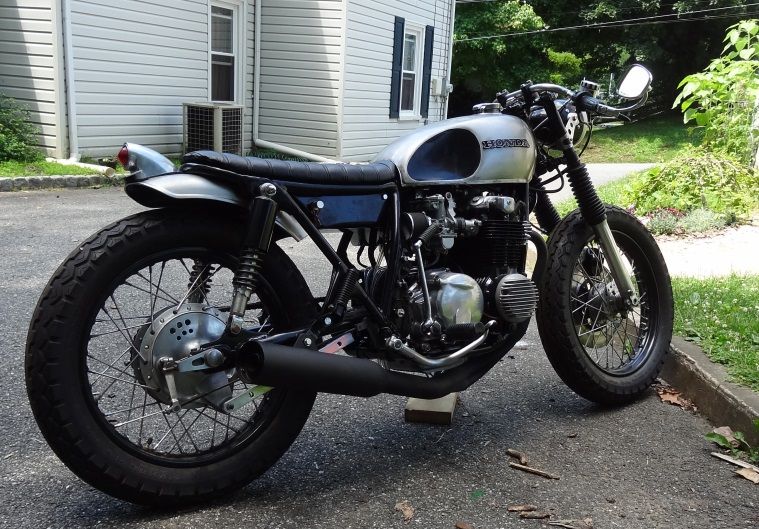
No, I'm not dead.  I had to put Ava a side for a while while I finished up this '75 cb550 ("the Rabbit").  I wanted to finish it to sell it so I can put it back into Ava.

I'll be back working on Ava now that the 550 is done.  I did get the Earls front end straightened, and I've decided to powercoat the frame and front end, so I'll be sandblasting next.